We can no longer avoid passwords in our lives, whether it is online banking, e-mail, shopping, the use of passwords is necessary everywhere. That’s why we need an administrator, a password manager and it’s called Bitwarden. Many Internet users rely more on convenience than security.
Almost every third user in Europe uses the same password for several online services and this is a major security risk. Once such a password is cracked, cybercriminals can take over the user’s multiple digital identities.
What should password protection look like?
Even the longest passwords do not offer perfect protection. But the following tips make cyberattacks much more difficult. They use a different password for each online service, passwords must be complex, with letters, numbers and special characters.
Password managers are used that store all used passwords in an encrypted file. Users only need to remember one password, the master password. So we come back to the magic word Bitwarden, the ultimate password manager.
Docker and Portainer – Raspberry Pi installation
Of course, it is possible to use Bitwarden without a Raspberry Pi installation, but if you already use a RaspPi at home and do not want to save passwords outside the home network, then the Raspberry Pi is the right choice. Mini PC consumes very little power, has enough resources and can manage several applications in parallel.
So it is not a problem to run Bitwarden with the Smart Home program, the Bitwarden password manager uses very few resources.
Bitwarden is an open source password manager available for Windows, Mac, Linux, Android, iOS and various browsers like Firefox or Google Chrome. Password management is possible from anywhere.
Next is the installation of the Docker application and Portainer, the docker application manager.
Docker is an environment for installing software applications. It uses containers as isolated user space environments that run at the operating system level and share the file system and system resources. A big advantage is that containers use significantly fewer resources than a conventional server or virtual machine.
sudo apt update && apt upgrade -y
curl -sSL https://get.docker.com | sh
After that, we add the Pi user to the Docker group and continue with the Portainer installation.
sudo usermod -aG docker pi
sudo docker pull portainer/portainer-ce:linux-arm
Now we start the container in which Portainer works.
sudo docker run --restart always --name=portainer -d -p 8000:8000 -p 9443:9443 -v /var/run/docker.sock:/var/run/docker.sock -v portainer_data:/data portainer/portainer-ce:linux-arm --http-disabledAfter a short time, Portainer is ready and the web interface can be accessed via HTTPS port 9443 and the IP address of the Mini PC device. There you must first create a user and an associated password.
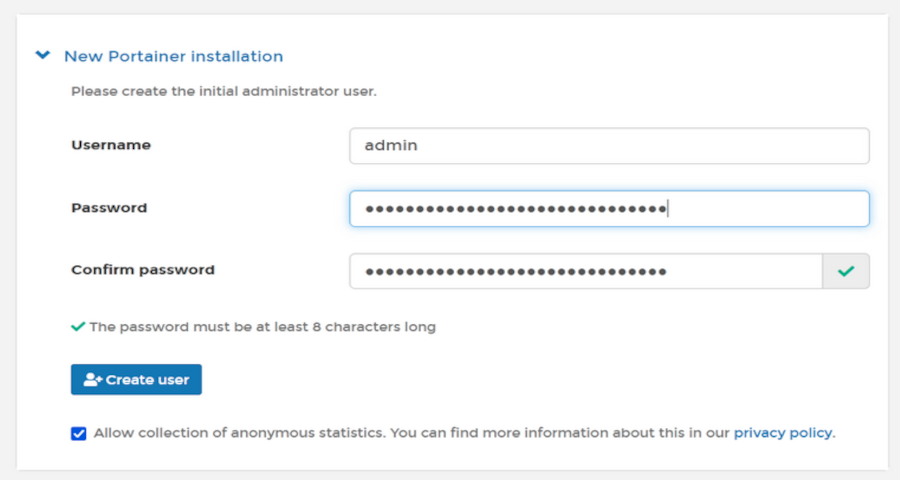
Assign a fixed IP address to the RaspPi according to your router’s instructions to ensure access even after restarting the mini PC.
Bitwarden installation using Portainer
Now we login again to the web interface with IP address and port 9443. Then we click on local to see the local configuration.

Next, select a volume to create a storage location for Bitwarden data. Otherwise, all data could be lost with each reboot since the container does not store any data internally. Let’s assign a name to the volume, for example Bitwarden and click on Create volume.
We continue with the creation and configuration of containers, on the left menu bar, click on Containers, and then on Add container.
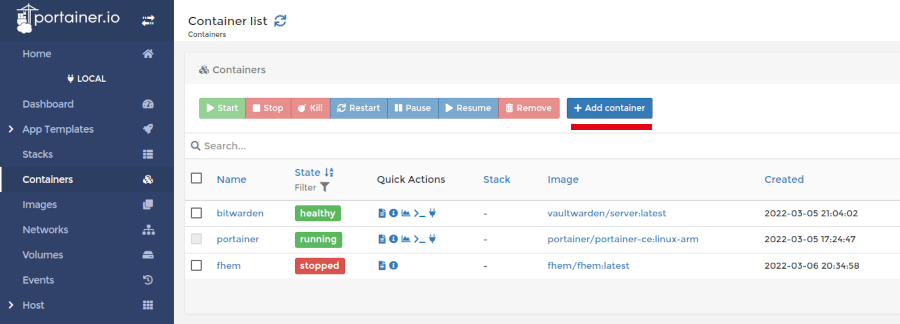
The container is given a name, for example Bitwarden. We enter vaultwarden/server:latest for the image name.

Under the network section we have to set two ports, so we click twice on the menu (publish new network port) new network port. Here we use port 7277 container port 80 or port 3012 forwarded to container port 3012.

Now we need to assign the corresponding volume to the container. So, click on Volumes. In the top line container, we enter /date, and the volume below is bitwarden-local, that is, enter the name you assigned to your volume with the addition of local.

In the Restart policy section
, select Always, so Bitwarden will start automatically after restarting the Raspberry Pi device.
All settings are done and now click on Deploy the Container, then Bitwarden will be installed and run automatically. The password manager is now running, but cannot be used until we set up HTTPS access.
This is because the Bitwarden web interface uses certain JavaScripts that allow the browser access only through an HTTPS connection. HTTPS support is achieved with a proxy server. The proxy sits in front of the Bitwarden server and forwards requests.
Important: The ports for the Letsencrypt certificate (Port 80 and 443) must be open to the Apache Server, if you have a Fritzbox then the settings are as follows: Internet >> Freigabe >> Portfreigabe.
You can read the installation and settings of the Apache Reverse Proxy server, including the installation of the Letsencrypt application, in the article Fernzugriff mit Apache und Letsencrypt.
According to the instructions, install the Apache2 server, create a configuration file (use port 7277 for Bitwarden), then install the certbot Python Script. Run the Letsencrypt certification and finally set up a regular refresh of the Letsencrypt application using cron.
To make the Bitwarden application available via the Internet, it is best to use a DynDNS domain such as DuckDNS or a similar service.
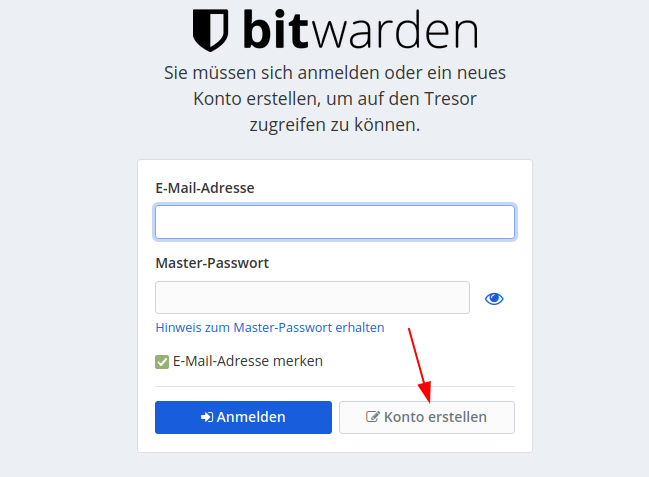
Bitwarden – Admin activation
You’ve created an account, now we need to generate the admin token you need to access the Password Manager admin interface. The administrator token must also be entered in the configuration of our container.
We need the token, for example, to display all registered users and delete them if necessary, as well as to generate invitations for new users.
To generate a new admin token for the Bitwarden app we use Terminal (Linux | Mac) or you can run it directly on the RaspPi mini PC. The admin token must remain secret, otherwise anyone can have full access to the Bitwarden server.
openssl rand -base64 48Now we switch to the Portainer application to enter the token, start the configuration console, press stop and stop the Bitwarden Container, then select Duplicate/Edit from the menu.
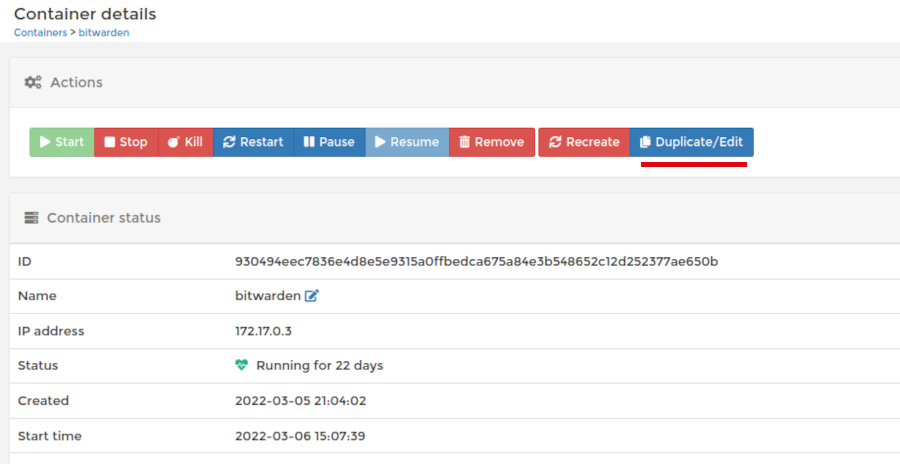
Scroll down to advanced container settings and click on Env (Environment Variables).
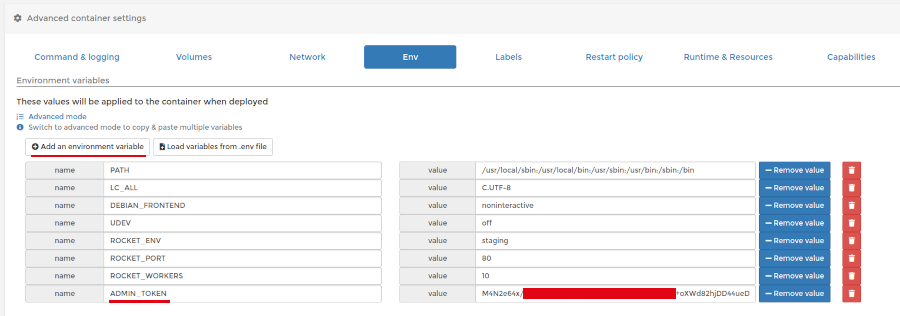
Now you need to add a new variable with Add an environment variable, the name of the new variable is ADMIN_TOKEN, and the value is the previously generated token, the image above is self-explanatory. When you have entered everything, click on Deploy the container and the container that includes the admin token will be recreated. If you are prompted that a container with the same name already exists, answer replace.
The Bitwarden Admin interface is available with https://Domain/admin

Here I would also like to mention that if you do not have a Raspberry Pi mini PC at hand, it is possible to use the Bitwarden server directly. The negative side is that your passwords are on a server that you do not control, and if you lose your password then you have a problem.
There is the possibility of installation on a VPS/Cloud server where for a small amount of €1 to €2 per month you get an Ubuntu server on which you can install several useful applications, such as Wireguard VPN.
The Wireguard VPN application is free and especially useful for mobile devices, which today are most exposed to the possibility of hacking and data theft due to access to insufficiently protected networks.
We intend to describe all these examples in the following articles, if you are interested in free information from our portal, you can register for our newsletter.
And so we have come to the end, you have successfully installed Password Manager including the admin panel, don’t forget to run a backup of the vault every now and then and save it to a safe place.

 At SmarteHacks.org, we use cookies to analyze website usage, improve user experience, and offer you content, products, and services that best match your interests. If you click on “I accept all”, then all cookies are used. You can, of course, change the "Cookie settings" and determine which cookies you want to accept.
 Na portalu SmarteHacks.org koristimo kolačiće kako bismo analizirali korištenje web stranice, unaprijedili korisničko iskustvo te vam ponudili sadržaj, proizvode i usluge koji najbolje odgovaraju vašim interesima. Ako kliknete na "I accept all", tada se koriste svi kolačići. Možete naravno da promijenite postavke kolačića sa "Cookie settings" te sami odredite koje kolačiće želite prihvatiti.